Showing posts with label Research. Show all posts

Friday, 12 February 2016

ANIMATION: 3D modeling 2D turn sheet

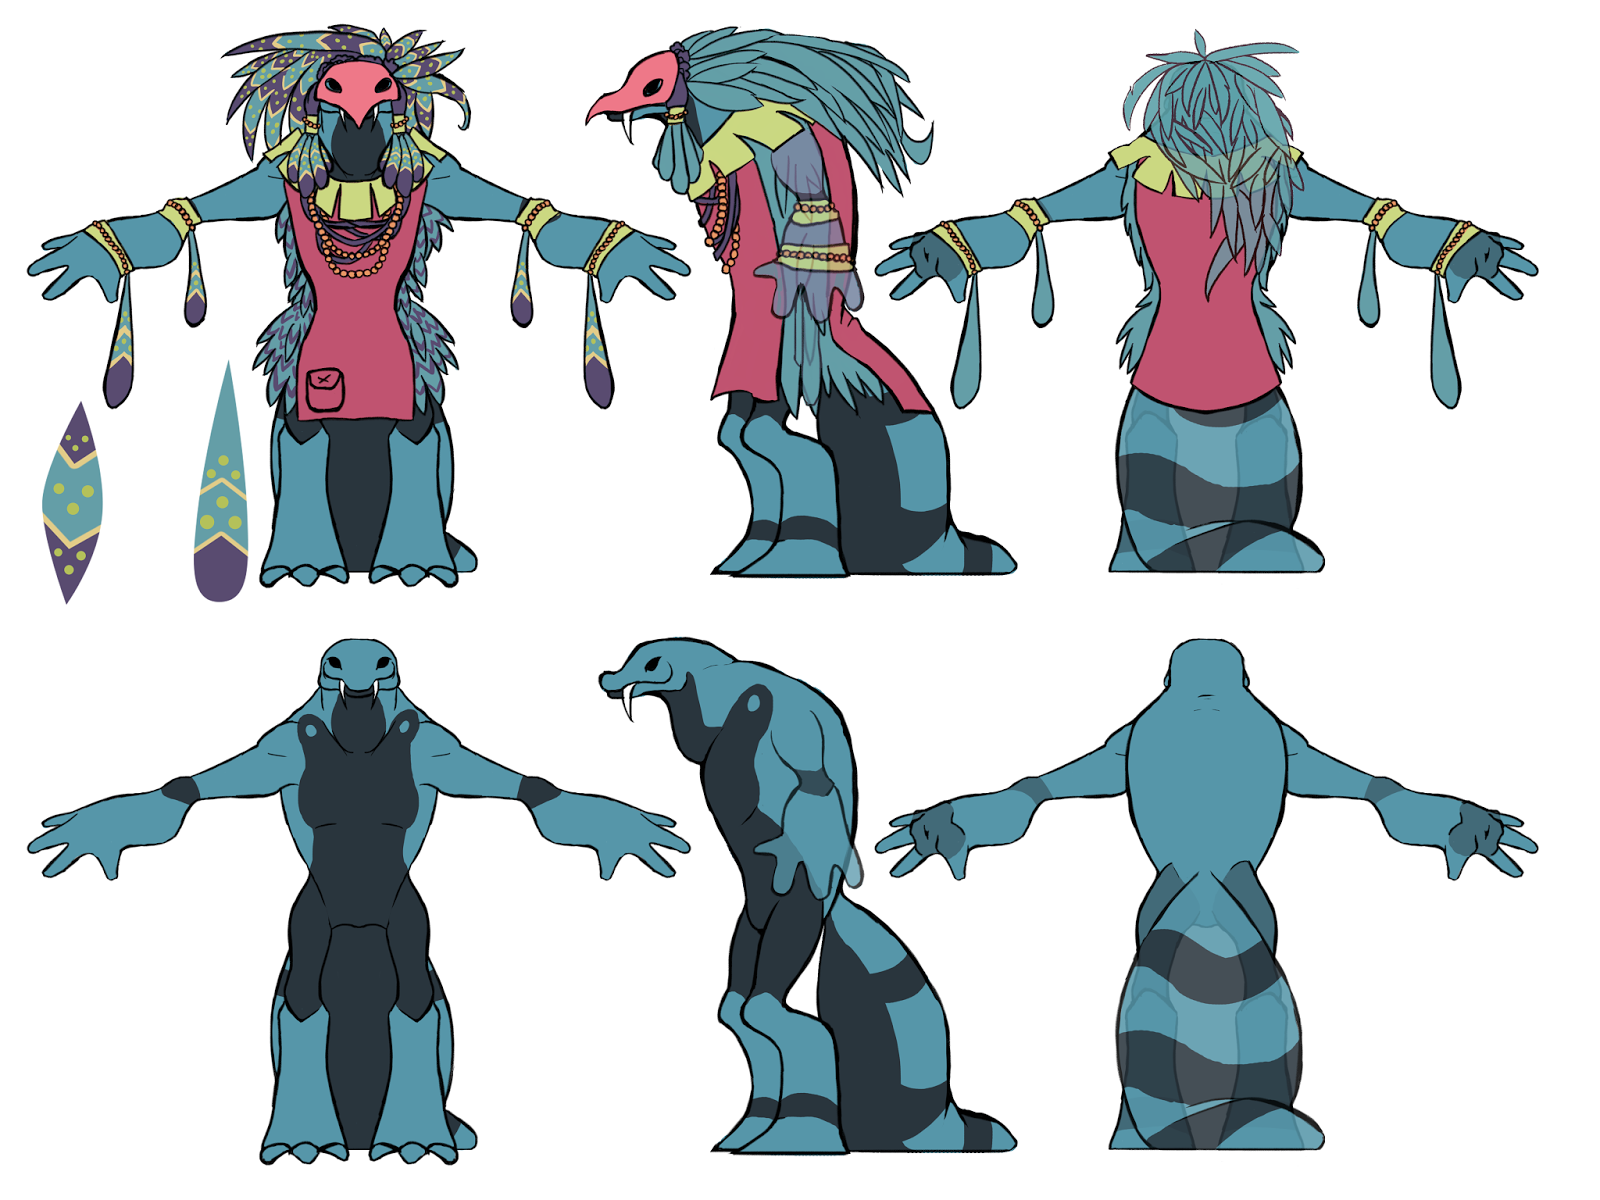
For my turn sheet I used a turn sheet I had made in my game project. I wanted to sue this because I felt it was more accurate than a new one and I had put time into the designs.

I attempted it 3 times. I used this turn sheet at first and tried boxing it out. I then got demoralised and felt lost on where I was and how to do it, I was very confused on to how to make the arms, tail, and leg I had messed up along the way so i wanted to start again.
I was not intending to model any of the clothing. 

Eventually I started again with a different turn sheet of the same batch. I got a lot further and made the arms and tail with it, but I was unsure how to duplicate the arms and mesh them together. I ran into the same issues with this and Maya had gotten stuck on a high-poly version which would not divert back to the low poly for me to edit, it also kept crashing. (I would later find out this was because I needed to delete the history and the model would go back to low-poly if I had just restarted the program. I wish I had not ran into this issue because it was easily fixed and I didn't work hard enough to fix it. I wanted to start on an easier model sheet.

Looking back it may have been best for my time management to just go with this design from the start and work with it however in the stage of making it higher-poly I found many overlapping polygons that I could not fix and I feel I learnt more from working on the 2nd model in the end. 

 I decided after making most of it it was best to go back to the 2nd and fix it as I felt I had wasted too much time restarting and was further with that one. I think I should have just stuck to one but I don't regret the learning experience of making theses, even if they're not complete. 
I got help with copying the arm through duplication and I managed to conjoin them using tools my lecturer showed me. I managed to learn how to do this, and how to extrude quickly as well as short cuts for changing it to a higher poly. 

I needed help exporting it into Mudbox and managed to fix the model with the extra vertexes in order to do so. I used Mudbox to clean up the model as I was unable to do so in Maya but this was rushed as I had wasted most of my time making multiple models. I am glad I planned out my time so I would have extra time for this. I smoothed it out and then put it back into Maya for rigging. Before rigging I wanted to try UV unwrapping and making textures. I had not had a lecture on this yet and had no idea how to do it. I managed to unwrap it with the use of an extension. I was not entirely sure of how to do it and I don't think I did it in any good way but I'm glad I had the learning experience. I had no idea how to use alpha channels and such. I rigged the model with relative ease but I found that the animation needed more time on fixing the rig for the folding of the model which I got completely stuck on and admitted I had no time to use for it. I animated it quite simply and exported it into the Gallery. I spent the remaining 5 hours I had allocated myself to place everything in the gallery, set it up to work in Unity, play test it, and make sure everything worked, testing the CD-Rom before submitting the piece. 


Tuesday, 5 May 2015

TBS: Animations final

For the last leg of the course we were in crunch hour and it seemed we were all finally pulling our collective weight. I think if we had worked at least half as hard as we did in the last week we could have achieved so much more. In the end I wasn't able to complete my animations for the game and had to leave a few out as even though they were close to finished and placeholders were ready we couldn't program them into the game. As sad as that was I'm glad it's finished and I can reflect on it now realizing the large scale of work I did do and how I can now work at a much faster pace. Team members finally helped me with the animations at the end, helping with the simplest colouring of the animations late into the night before, it wasn't much in the grand scheme of things but it was a huge help. Many of the following animations were unable to be put into the game even as a placeholder due to no programming able to be found for the requirements to make the animations happen in game.
This animation could have been in game but the programming to do it would take too long and we would have missed the deadline.

We did not know how to program a death sequence into the game.


The following were finished by other members of the team while I finished the above. Many of these were also unable to be programmed into the game, endign up with only the L/R movements, Statics, and the Hits of the Shadowwalker (the tall one). I finished a static one as an example. 

The attack animation for the Shadelings was revised many times as I could not animate how I wanted it to look due to skill sets and what I was able to do the team mates were unhappy with, this was the final one I managed to do which met halfway what I wanted but could not do and was greatly appreciated by the group.

Death animation we couldn't program in. 

Hit animation that was done quickly and then was not able to be implemented into the game.

L/R animation was used for U/D movement too. 

An up/down aniamtion that was not able to be put in due to time. 

Split animation was another attack for them. Also unused.


Tuesday, 17 March 2015

ANIMATION: monty

Originally in the file I had before I lost it due to lack of space on the University computers I had animated the Monty rig so it moved across the screen but I wanted to make a looping animation so I animated it on the spot, this meant I could focus mor eon the movement of the animation.
I feel I wasn't as good at this as I was on the 2D walking animations I've done. I wanted to put more of a bounce into it and give it more of a life. I wanted to put more rotation into the head and more bounce in the step but I feel I neglected this part. 

ANIMATION: 3D boney

For this animation I wanted to animate the Boney rig to push against the wall and then give up.
Setting up the rig so it's arms were against the wall was easy enough, in my original that I had lost the save file of I spent a long time on the original setting the arms up against the wall focusing too much on preparation. I had timed my animations so I would have time to spare but I was not aware of how long it would take me to finish the boney rig; it took me 3 days.
I had huge troubles setting up the IK/FK switch that was important part of the animation. Due to this I wasn't able to find time to fix the animation afterwards using the graph editor to fix the points of the animation that went through the wall.
I googled tutorials for the IK/FK switch online and found a few videos that were useful but could not be applied to my rig, I found many tutorials that were valid but on the wrong program and I found myself stuck due to not knowing the program well enough to fix it myself and could not find a solution that made sense to my understanding of the interface. I then went to the library and took out a book suggested by the lecturers on IK/FK switches in Maya. I took out the book "Learning Autodesk Maya 8" and browsed through it until I found pages that could help, but to to no avail, much of the book told me information to do with the next step and not to do with the part I was stuck on. I found out how to switch the IK/FK from these books but I could not tell how to animate it with the IK and the FK. I swapped them but found I couldn't transition them. Eventually I found a lecturer after spending a long amount of time on the weekend tyring to do it on my own. I was directed to the teleportation section of the graph editor to fix the IK/FK switch and used coordinates to change the positioning so they matched after duplicating an arm. I found this technique easy after this and was able to hone and memorise the technique by teaching fellow course mates who were also stuck on it.

ANIMATION: 3D bouncing ball

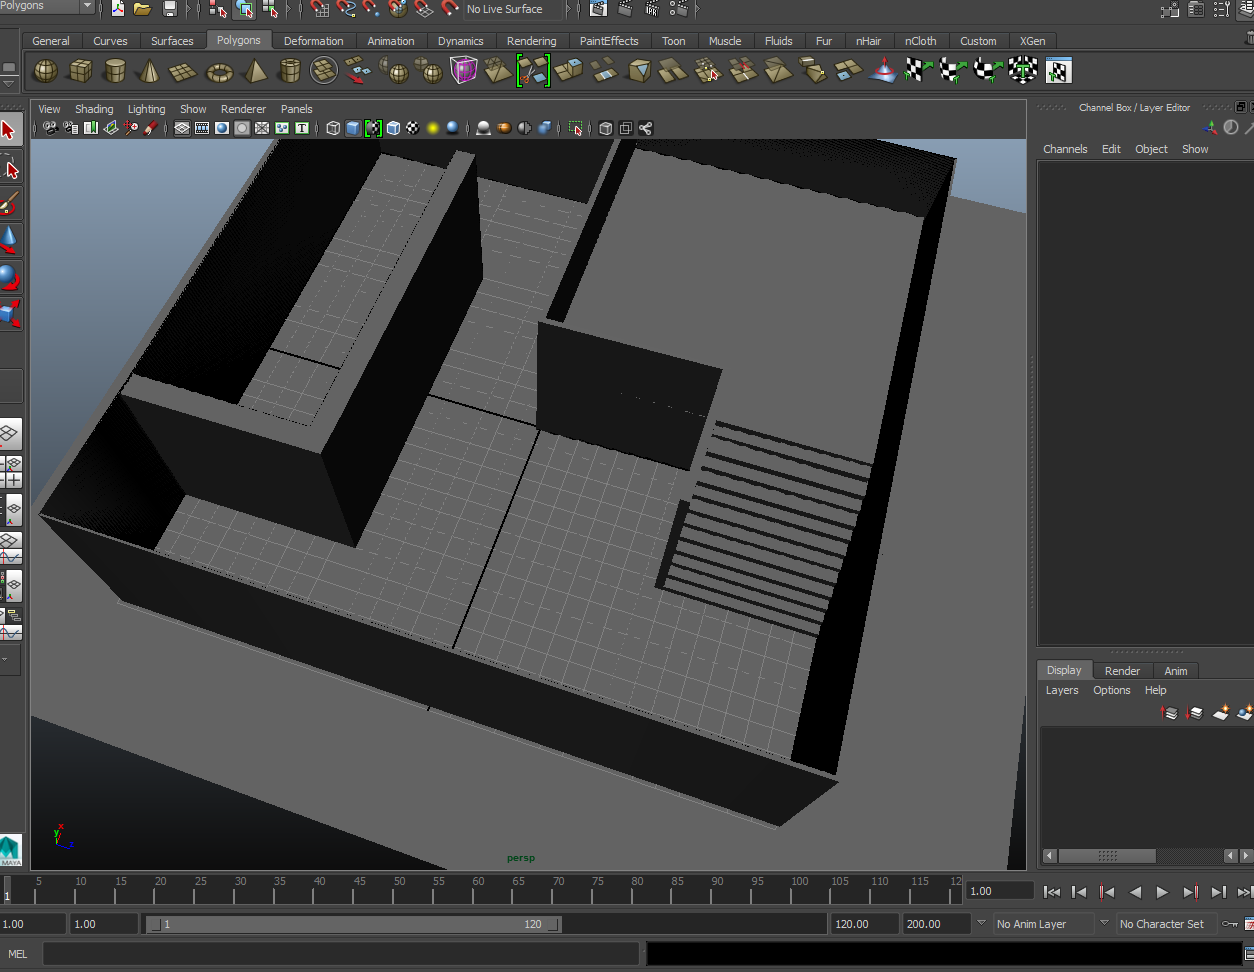
As soon as I knew the details of our assignment included making a gallery I went straight into Maya and designed a gallery with hallways and stairs with a floor. I wanted to add textures to the walls but had not had a lecture on UV unwrapping and knew I would have to save my time. I planned out a 2 week period to finish any of the animations I hadn't done and planned time spare for fixing things.

I had made the ball animation earlier in the lectures but had lost the saved file so I ahd to do it again. I wanted to add more to the animation this time by animating the ball moving forward towards the screen and then to have it roll off the edge. I edited it in the graph editor to make the bounces more accurate. 
Gif of the keyframes.


I also did an animation of a bouncing ball with a table, similar to the follow-through animation. The file was already provided and intended for use by students of the animation course for their show-reel, I saw no harm in using my spare time to practise it and learn more. I made an animation that would not move from the spot in Maya for practise in incorporating it into videogame use.

TBS: style guide

When making the decision on the style we had all the artists and myself go away separately and draw the same character from Banner Saga in our styles and in a style that we would like to see in the game. Mine was in my style but with extra colouring choices. Eventually we decided on my basic style with just cell colour and some cell shading to make it pop out from the painted backgrounds our background artist was making.

We were inspired by many games and art styles, some artists made a mood board and I made a mood board on colour-schemes.

I worked on redesigning the already existing designs into the style guide and photoshopped designs for how the game would viuablly look. I animated important parts to show how the animations would function and focused on the designs that would be included, there would be 3 different art styles, one for speaking-sprites (the most detailed ones), one simpler version of that in the battle screen, and a very simplified version for the grid screen that would represent the characters being a lot smaller.


I made designs for talking sprites


Examples of the grid animations using various background to make sure it's compatible.

Example of the battle screen

I then drafted out instructions and details with the image examples when writing up the style guide.

I showed examples of the anatomy style and detailed how to recreate it for the other artists.


ANIMATION: diving

I spent a lot of time and effort on this animation however I feel like I spent too much time on minor details and not on the main-subject. I should have shown more of the diving than the gloss and extra details. I started with a basic story board.


I drew out the secondary character's animation making sure it would be an even number because I knew the final animation would have 20 frames. I made sure it looped then I started on the background. Once the background was done along with the animated parts of the background (the diving board) I drew in the keyframes for the main character and animated her by adding in the tweens. I drew in the splash animation after. I lined and coloured them at the same time as drawing them as I had added such details in the story board earlier. I had planned out the main character's design before drawing so it would be consistent. I made minor changed to the animation from the story board but I added in enough detail to make a mostly rough key-frame animation from it,


ANIMATION: walking forward

I found this assignment very easy as for the main-game project I was already practicing on making animations of people walking forward. I did not have the same elasticity and freedom in that assignment and since the characters were asymmetrical I coudln't do it as fast or easily as I wanted.

Keyframes I was working on before this assignment of walking-forward (and backwards) animations for our game project.


I drew out the keyframes of the piece and filled in the tweens and then flipped it and matched up the legs so the animation would loop walking forward. I wanted to give the person a bounce in their step and a jolly look with swinging arms.

Friday, 13 March 2015

TBS: Races P.3

Once I had the synopsis of the race written out and defined I started plotting out the basic visual design. I focused on elements that would be visible and communicated them through image; colour, clothing and the masks were important. I left the form, anatomy and over all shape of the Palai-Plai for later when I would design the naked anatomy.  wanted to get the basic design of their clothing on paper first, I would redesign these to fit the new anatomy once it was finished.


I started with designs for the mask and where the feathers would be for decoration on most costumes. I started off with more details and cut back the details later for the sake of the animations and to keep the designs aesthetically appealing without clustered buzzing designs. 

I jotted in details I wanted for the body like large arms that looked like feather-less wings, claw like feet, and hashed out the general colour schemes. I wanted it to be bright, vibrant and powerful. I added extra details into the clothed design.

I drew out the same design in detail putting it into a pose to see if the design would work more in-action. I knew I would make changes to the anatomy again later but I wanted to put a general theme to it. I added more details to this than I should have and it would help me flesh out the extent of the clothing's details for the final design. I wanted it to have a lot going on due to their bold and arogant culture but I also wanted to keep it aesthetically pleasing with a nice form that would not be clouded with too much detail and as a result might loose it's silhouette.


For the final design of the Palai-Plai I worked on a mood board of the lizards I would be using as inspiration.

"I chose the Monitor because they are the biggest group of lizards (aside the crocodile family) and also because recent research has shown they have similar breathing patterns to birds. They come in a variety, I think they have a unique look to them, especially the legs and movement. The Nile, Blue Spotted, and Ornate Monitor will the the 3 main examples for this work. Nile Monitors are aggressive enough to suit the race. I also did research into the first discovered species of bird and dinosaurs with feathers to relate the clothing design to the lore."

Using the mood board I made, I drew out basic designs of the form, shape, and anatomy. 


Originally I wanted for the captain and unit types to be coded by bird names that suited them but I felt it would confuse the player. I tested colour schemes and patterns on these sketches based on the Monitor's patterns & colours I made both a bright version and a de-saturated version to fit the plain design for the Palai-Plai in contrast to the brightly coloured clothing they would be wearing. I made each of the 3 designs have a completely different anatomy and silhouette but with overreaching themes such as the beak, arms and legs. Each were based on slightly different lizards. I decided that the Tactician, Healer(later), were female and the Bruiser and Commander (later scout) were male. I changed their designs slightly in the final to fit their new roles once the statistics were planned out and merged the designs of the Tactician and Bruiser's main anatomy but gave them vastly different clothing. 
I sketched out clothing designed on top
Then I drew out turn sheets keeping the proportions more accurately drawing them naked and deciding on their skin colours and patterns, then adding clothing. I reused clothing designs from my earlier conceptualization stage of the Palai-Plai for the Tactician who had the strongest design as they would be the playable character. They would be the one who would also reveal their face in the plot so I drew up two versions of it. I wanted them to be a combination of bulky and curvy. All the designs would show a bit of flesh except for the Tactician who showed the least as they would have their face showing later. This gave a good ratio of skin to costume. I felt the skin had to be shown because the anatomy of the characters was completely made up and players would not know the form otherwise, especially with the feathers hiding the figure. I drew up the character's feather designs separate for reference in the turn sheet. I made the costumes for each reflect their need for movement and their armour. I used more blockier anatomy for characters who were muscular and more rounded ones for weaker characters.


I brainstormed colour scheme options for the characters before picking.