Sunday 26 February 2023

Toon Boom Harmony: Method for Green Screen Mask/Cutting a Mouth On Side View with Deformers

 Gosh, I hope I am able to adequately explain this one! If it's not clear, feel free to comment for further info. 


Short Intro before the Tutorial

I kept running into the issue of wanting to cut away the head for a Side/Profile view of a rig. There's been various times when I figured it out, and then always found myself at square one when I tried again. Usually because the rig I was working on was different to the last one. 

If you've found this tutorial, then my SEO might have succeeded, because for the life of me I have never been able to find a tutorial for this myself, be it Toon Boom Forums or YouTube. Part of the reason I typed this up is from seeing a lot of disappointment on the TBH Forums on people's inability to find a solution for this. 

I will not be going through the basics on this, as this tutorial is more for the intent of having a method for side view-mouth cutting away the head, as I could never find a quick reminder of the method on Google. 


Start!

Deformed Mouth 

Let me start by introducing the rig I used for this, as each rig is different. 

This rig's mouth is made up of 4 components: Mouth insides, the lips, and the lines. 

The Top Lip and Bottom Lip have deformers to pose the shape of the mouth, both open and closed. 

In my rig there is the Mouth Line and the Lips, the Lips will mostly be ignored in this tutorial, as they are a unique shape that is purely aesthetic and ha no baring on the cutting. 


Drawings

The Mouth Line (black on Line Art) should be the same shape for both Bottom Lip and Top Lip. I copy-paste the Vector Line from one drawing to the other to ensure it's the same. 

The Mask (yellow on Color Art) is a coloured shape using the Line Art's Mouth Line's stroke. 


The Mask is bigger on the Top Lips than on the Bottom Lips

Here is the breakdown of the drawings without the cutting settings


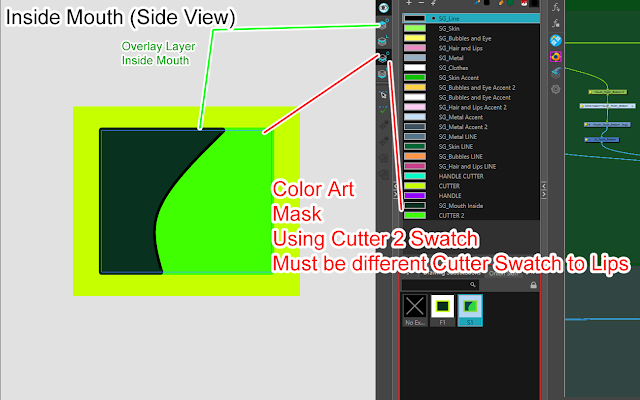
I have two cutter Swatches and for this method.

The Lips have CUTTER 1 (Yellow) and the inside of the mouth has CUTTER 2 (Green).


Examples

Here is an example of how the Rig looks when the cutters are working:

Note, the lips have to be posed for each shape. 

Front View

Posed with deformers:
Not Posed:


Side View


Posed (Deformers on display): 
Not posed:


Setting Up the Cutters (Front View)

Once the drawings are set up I create the Deformers. I use Envelope Deformers. Before the Cutters are set up, you can see the Mask. 

Make a curve for the lips to move on the centre of the Mouth Line, and then outline the Mask before closing the Envelope. 

I do this bit of the rigging stage at "Setting up for the Side View" stage as I copy the deformers. I will explain how to copy deformers there.  

You can create the Deformer for each shape from scratch. If you create the deformers from scratch, then create the Deformers now. 


Here is the Deformers visible on the lips, both deformers are the same. 


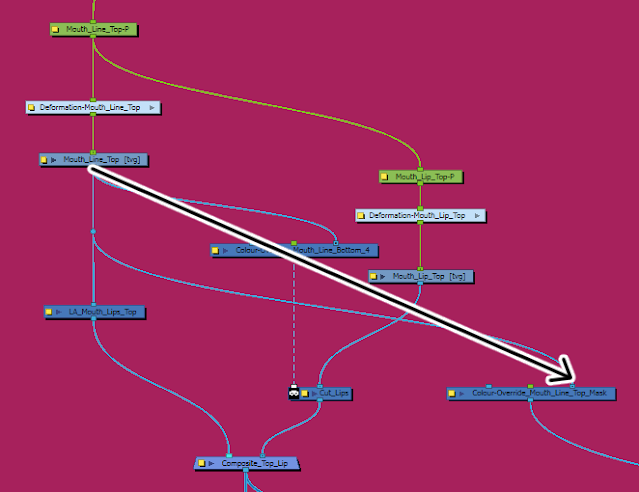
Explaining the Cutter Set Up

Setting Up the Top Lip

1) Add a Colour Override
This can be done from the Node Library Tab, click and drag it into the node view.


Or if you press Enter on the Node View and type it in.

I rename my Colour Overrides when complete. 


Connect the Top Lip to a Colour Override like so:


2) Click the Yellow Box on the Colour Override to go to the settings

In the Colour Override Settings:
Render Selected Colour Only>Render Selected Colour>Select CUTTER 1(Yellow)


3) Connect the Colour Override to the Left Side of a Regular Cutter.

Connect the Left end of the Cutter to the Inside Mouth Composite

Top Lip Set Up:
Now it looks like this:


Setting Up the Bottom Lip


This is Essentially the same as the last step except for two key things

1) Set up a Colour Override with the same settings as the last Colour Override. 

2) Add an Inverted Cutter under the last Regular Cutter and use the Colour Override of the Bottom Lip to cut with the CUTTER 1 Swatch. 


Bottom Lip Set Up
Now it looks like this:


If this mask is bigger than the Top Lip's Mask then it will cover the insides. 


Setting up for the Side View (Drawings)

1) Prepare the second drawing, S1. I rename the drawings. Crtl+D to change the drawings names. 
F1 for Front View and S1 for Side View

It is set up in the same manner as the Front View but for the side

Make sure you have set up the Inside Mouth too. 
For the Inside Mouth you must use a second cutter swatch, CUTTER 2 (Green). 
Make sure all the drawing substitutions are named the same!
CTRL+D on the Camera or Drawing View to Rename the drawings. I use the Drawings Substitution window to quickly see the drawings and names so I can check this. 


2) Click the Drawing on the Node View, then Click Create New Deformation Chain


3) Then create the envelope for the side view like you did for the Front View


If you need, add a display to the Drawing of the Mouth. Ctrl+Y or find it from the Node Library or with Enter like for the Colour Override. 
This means you will see the mask while making the envelope.

To save time and so I can copy keys on each lips, I copy the Deformer Group and connect it to the other Mouth Line. Then I use Associate Parent Transformation Switch to make sure the Deformer works. This tool needs to be added to the Deformer Tool Bar by Customization. 

Here is official Toon Boom Harmony documentation on this process and why I use it. 


4) I rename the transformations:


I use the same names for the two transformations as the drawings. 

5) To make sure it works go into the Deformer Group 

To enter the group click the Arrow on the Group: 


Inside there will be a Transformation Switch. The Groups are the two deformers the drawing how has (F1, S1)

Make sure the names are correlated. As I rename the drawings and the transformations it's easy to understand F1=F1.
If you don't rename them it will be called something like "Transformation 1 [1]"

The name in the settings will be the name of the Deformer, and the name you can edit in the black box will be the name of the drawing. You can type it in freely, but leave the ; at the end. 
Once this is set up, it will link the deformer to the drawing. 
Most of the time you won't have to do this manually. 

You can change which deformer you are using with the drop down. 


6) Sync all the layers needed for each side view.
You can manually change each drawing, but I prefer to Sync them as I there's no reason to have the front View Top Mouth with the Side View Mouth

First: Make sure all the drawing substitutions are named the same. 
For me, the Mouth Top, Mouth Bottom, and Inside Mouth are named F1 and S1

7) Select all but one of the Drawings to be synced (Top Lip, Bottom Lip, Mouth Inside)
Go to the Three lines on Node View next to the Home Icon> Nodes > Sync Layer With...

This Pop-Up will come up:

When you click the drop-down you will then be able to type into the bar to search for the node:


Once Selected the Nodes that are synced will have : at the end of it. Now when you change from F1 to S1 all the synced layers will also change. 


Setting up for the Side View (Cutters)

The CUTTER 2 for the side view will be over-spilling 


1) Put a new Colour-Override under the Mouth Composite. 
Press Alt when connecting it to not need to reconnect any wires. This is the output Composite and will go to the Display and out of the group (however you've set up the rest of the Rig)


Select all the colours you have in the mouth including any Handles and CUTTER 1. Do not include CUTTER 2.
The CUTTER 1 needs to be exported through this filter otherwise the mask will break. 


2) With a new Colour Override, make a second connection from the Mouth Composite to this Override.

These are the settings: Use CUTTER 2.
I name this Override "Mouth Inside Mask"


3) Now connect the other end of the Mouth Inside Mask Override to a Cutter connected to the Head Composite:


4) Now the Rig should work for Inside Mouth Cut from Side View and from front view.
This method can be modified to work for drawing Substitutes so long as the Colour Overrides are set up the same. 


I use 2 Cutters to make sure there is no program glitches and to make sure there is no confusion, but it might work with one Cutter Swatch. 

I have tried this method with Layer Separation instead, but it does not work. It need to be with Colour Overrides which is why you need more than one Cutter Swatch. 


And there you have it, a way to make a mouth greenscreen cutter that works on the side view in Toon Boom Harmony.


Further Reading and Credits/Thanks

I would like to share some of the public tutorials I have used to help me get to this solution here

Firstly would be Kyu-Bum Lee's rigs which are available on GumRoad. Studying an deconstructing these rigs has been very useful to my own studies. 

Much of the reasons for using a Deformer Mouth came from following this Toon Boom Webinar.


Sunday 7 November 2021

Week 1... November 2021...


I wanted to draw witches this month. I also was interested in telling tiny simple stories through single images. On top of that all, my focus this month was on learning Perspective and using the Golden Ratio.

Midnight Snack...

I liked the idea of a witch living in a normal enviroment. For this, the idea was a witch being judged by her flatmate for midnight snacking. 

(Clip Studio Paint)

I sketched out the pose and layout of the characters. There would be a 1 point perspective, the witch would have a flowy pose with a clear line of action. I drafted the positions using my own guides for how she would be positioned to use the golden ratio. I had spent a few days researching the golden ratio, and a few more days observing the ratio in real life, trying to see it wherever it arose. 
I wanted the witch (and the fridge she was raiding) to be a line of vision for the golden ratio, and the cat to be another focal point. She would be within the 1.61803398875 of the ratio, and the cat would be outside of it on the other end. She would be looking at the cat, and the fridge's light would lead the eye to the cat. So her position would be highlighted and his would also be a focal point. 


(Clip Studio Paint)
I went for a very simple witch design, a big witch's hat, a simple dress, rugid hair, and a large nose. Looking back, I could have pushed her pose further. There certainly is a line of action within her pose, I wanted her to point to the cat with her body language. 

(Clip Studio Paint & Adobe Photoshop)

I wanted magical smoke in the image, but I changed my mind as it cluttered it a bit. One of my more recent serious attempts at perspective. I used Adobe Photoshop to create the perspective guide. Clip Studio does have a tool for this, but I felt relying on a program to layout the kitchen would be unfair. While this image shows two perspective grids, I did not use both, I simply duplicated and flipped the perspective grids as I had used the same layer for the golden ratio grid. Earlier I used a rough one in Clip, but I adjusted and defined it more accurately using Photoshop's custom guides and a bit of maths. 
I changed the pose of the cat, I felt having the cat sitting down would show a more judgmental attitude to the animal. 
I tried to make the drawers of the kitchen, the window, and the fridge to add to the ratio. Having cluttered parts fitting within the ratios guides. 
Looking back, I really should have fixed the windowsill. I've learnt a fair amount of perspective from this and I will prefer to use the tools within Photoshop for it in future. 

(Clip Studio Paint)
I laid out the shading with textured brushes working in black and white. I made a focal line from the fridge's light, following the eyeline of the witch to the cat. 

(Clip Studio Paint)
Separately I laid out the flat colours of the kitchen, contrasting the witch's green skin and fridge to the brighter purple of the kitchen.

(Clip Studio Paint)

(Clip Studio Paint)
Finally with the multiply tools, I used the greyscale shades to shade the flat colours. I added some overlay layers of different hues of blue and purple across key points in the image to allow some colours to pop. I brightened the lines around the cat so he didn't blend in with the background. Some more darker overlays to add to the deep shades, some noise textures around the border of the image, and ofcourse, a few glow effects on the fridge to allow the deep shadows to work. 


Winter Witch...

(Clip Studio Paint)

(Clip Studio Paint)

For a personal image, I was still interested in drawing witches. I designed a witch girl who would be a Winter Witch. I wanted to convey in the image that she used her powers for mundane things, such as growing flowers out of season. Much like the last witch image, I was using the Golden Ratio again to layout my image composition. I tried to use the character, background, and sunflower within the ratio. 

In making this image I designed the character out first, simplistically exploring the design, using sharp shapes for her design, and then exploring colour. I then explored seasonal colours and designs to see which would inspire most, as the theme was already in my mind. 


(Design Exploration)


Highstreet....

(Adobe Photoshop)

After working on the perspective with the Midnight Snack image, I went back to basics. I found a few inspirational images from me peers and tried to replicate the simple styles, with the bricks and scuffs and line quality. I used a reference image of a highstreet to study perspective, and went out of my way to work solely in Photoshop for this. As much as I love Clip Studio, sometimes it feels a bit like a crutch. I used simple shading to add depth.


After this... I will continue to work on perspective for the rest of the month....
(07/11/2021)