Gosh, I hope I am able to adequately explain this one! If it's not clear, feel free to comment for further info.
Short Intro before the Tutorial
I kept running into the issue of wanting to cut away the head for a Side/Profile view of a rig. There's been various times when I figured it out, and then always found myself at square one when I tried again. Usually because the rig I was working on was different to the last one.
If you've found this tutorial, then my SEO might have succeeded, because for the life of me I have never been able to find a tutorial for this myself, be it Toon Boom Forums or YouTube. Part of the reason I typed this up is from seeing a lot of disappointment on the TBH Forums on people's inability to find a solution for this.
I will not be going through the basics on this, as this tutorial is more for the intent of having a method for side view-mouth cutting away the head, as I could never find a quick reminder of the method on Google.
Start!
Deformed Mouth
Let me start by introducing the rig I used for this, as each rig is different.
This rig's mouth is made up of 4 components: Mouth insides, the lips, and the lines.
The Top Lip and Bottom Lip have deformers to pose the shape of the mouth, both open and closed.
In my rig there is the Mouth Line and the Lips, the Lips will mostly be ignored in this tutorial, as they are a unique shape that is purely aesthetic and ha no baring on the cutting.
Drawings
The Mouth Line (black on Line Art) should be the same shape for both Bottom Lip and Top Lip. I copy-paste the Vector Line from one drawing to the other to ensure it's the same.
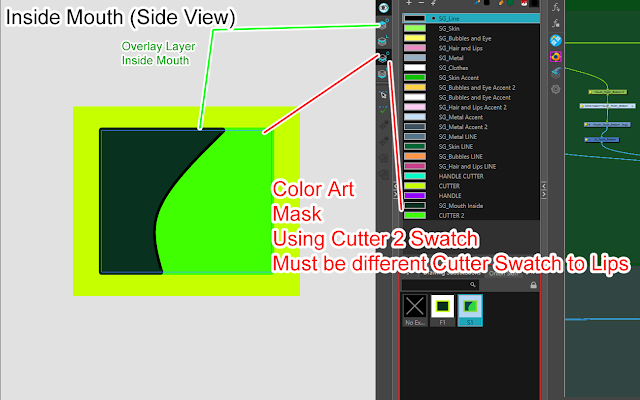
The Mask (yellow on Color Art) is a coloured shape using the Line Art's Mouth Line's stroke.
The Mask is bigger on the Top Lips than on the Bottom Lips
Here is the breakdown of the drawings without the cutting settings
I have two cutter Swatches and for this method.
The Lips have CUTTER 1 (Yellow) and the inside of the mouth has CUTTER 2 (Green).
Examples
Here is an example of how the Rig looks when the cutters are working:
Note, the lips have to be posed for each shape.
Front View
Setting Up the Cutters (Front View)
Once the drawings are set up I create the Deformers. I use Envelope Deformers. Before the Cutters are set up, you can see the Mask.
Make a curve for the lips to move on the centre of the Mouth Line, and then outline the Mask before closing the Envelope.
I do this bit of the rigging stage at "Setting up for the Side View" stage as I copy the deformers. I will explain how to copy deformers there.
You can create the Deformer for each shape from scratch. If you create the deformers from scratch, then create the Deformers now.
Here is the Deformers visible on the lips, both deformers are the same.
Explaining the Cutter Set Up
Setting Up the Top Lip
Setting Up the Bottom Lip
This is Essentially the same as the last step except for two key things
Bottom Lip Set Up
If this mask is bigger than the Top Lip's Mask then it will cover the insides.
Setting up for the Side View (Drawings)
2) Click the Drawing on the Node View, then Click Create New Deformation Chain
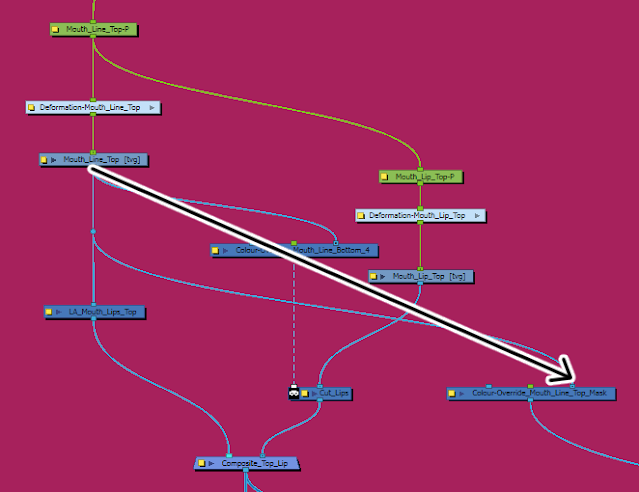
3) Then create the envelope for the side view like you did for the Front ViewTo save time and so I can copy keys on each lips, I copy the Deformer Group and connect it to the other Mouth Line. Then I use Associate Parent Transformation Switch to make sure the Deformer works. This tool needs to be added to the Deformer Tool Bar by Customization.
Here is official Toon Boom Harmony documentation on this process and why I use it.
4) I rename the transformations:
5) To make sure it works go into the Deformer Group
To enter the group click the Arrow on the Group:
Make sure the names are correlated. As I rename the drawings and the transformations it's easy to understand F1=F1.
6) Sync all the layers needed for each side view.
You can manually change each drawing, but I prefer to Sync them as I there's no reason to have the front View Top Mouth with the Side View Mouth

When you click the drop-down you will then be able to type into the bar to search for the node:
Once Selected the Nodes that are synced will have : at the end of it. Now when you change from F1 to S1 all the synced layers will also change.
Further Reading and Credits/Thanks
I would like to share some of the public tutorials I have used to help me get to this solution here
Firstly would be Kyu-Bum Lee's rigs which are available on GumRoad. Studying an deconstructing these rigs has been very useful to my own studies.
Much of the reasons for using a Deformer Mouth came from following this Toon Boom Webinar.


No comments:
Post a Comment